Since the last post, I've done a few things to make my workspace a bit better.
First I built myself a little shelf, so that I could have better access to my various paints, glues and other toxic chemicals. I just picked up a small sheet of thin plywood at Home Depot as well as some little 1"x1"x12" blocks of pine. I worked up some quick plans, drew them out onto the plywood, busted out the jigsaw and started cutting. After some gluing, drilling, a few wood screws, and a couple coats of gray spray paint, I now have a nice little shelf for my desk (you can also see here the monitor for the cam/computer setup I mentioned in the previous post):
Next, after knocking over my bottle of high-power plastic cement, and melting all the lines off the middle of my cutting mat, I thought it might be a good idea to make sure that doesn't happen again. Especially since this was not the first time I had knocked this same bottle over. After rummaging around a bit, I found some nice wood I had left over from the base I made for the Panzer project (red oak, I think). I cut a couple squares of this, glued them together, and then, using a hole saw, drilled a hole just a bit bigger than the glue bottle. A couple coats of polyurethane, and now I've got a little block that keeps my glue bottle from falling over and doesn't look too terrible.
Before I jumped into another long-term wooden project, I decided to make one more plastic kit. I settled on the Tamiya Calsonic Impul GT-R kit that I bought a while back, thinking it would be fairly quick and easy, since it doesn't have an engine and only a rudimentary interior. I had intended to build it straight from the box, but I couldn't resist adding an third party racing harness kit. Here you can see the completed interior, as well as the mostly-built exterior shell:
I should wrap this project up in the next few weeks, and then I'll get some proper photographs of both this completed model and the motorcycle model that I finished before this one. Stay tuned!
This is my blog about model-related stuff that I do. This may be plastic or wooden modeling, depending on my current project.
Currently working on: Model Airways Curtiss Jenny
Monday, July 5, 2010
Tuesday, June 22, 2010
Desk Cam!
Just a quick update to mention that I've started working on a new model, and that I've gotten a bit of a webcam working.
The new model is a Tamiya Calsonic Impul GT-R. I figured this would be a fairly quick and easy one, that would let me make something shiny and work out all the kinks in my new camera/computer setup before I jump into a long-term project.
Speaking of camera/computer setup, I've gotten a webcam/time-lapse thing working. I pulled an old computer out of the closet, got a cheap half-broken LCD monitor from a local used gear shop, and bought a decent webcam at Best Buy. I got the computer setup with winXP and a little free program called Dorgem that will drive the camera and allows me to both shoot an image every 30 seconds and save that to a file as well as shoot an image every two minutes and upload that to my website. Both of these are dependent on movement being detected in the frame, so it should avoid long, boring periods of my desk at night. The camera is pointing straight down at the center area of my desk, so you should be able to see what I'm working on, but can't really see if I'm present in the area.
So, yeah, if you want to see what I'm up to, model wise, have a peak at the new camera page here:
New DeskCam Fanciness!!
Note that while a new image is uploaded to the server every two minutes while the camera is running, the page itself does not manually refresh. If you want to get the latest and greatest image, you'll need to reload the page.
Also, the image has a date and time in the upper left corner. If that isn't a current (US Pacific time zone) time, then I've either got the camera turned off, or nothing is happening, so the camera has stopped uploading images.
Party on.
The new model is a Tamiya Calsonic Impul GT-R. I figured this would be a fairly quick and easy one, that would let me make something shiny and work out all the kinks in my new camera/computer setup before I jump into a long-term project.
Speaking of camera/computer setup, I've gotten a webcam/time-lapse thing working. I pulled an old computer out of the closet, got a cheap half-broken LCD monitor from a local used gear shop, and bought a decent webcam at Best Buy. I got the computer setup with winXP and a little free program called Dorgem that will drive the camera and allows me to both shoot an image every 30 seconds and save that to a file as well as shoot an image every two minutes and upload that to my website. Both of these are dependent on movement being detected in the frame, so it should avoid long, boring periods of my desk at night. The camera is pointing straight down at the center area of my desk, so you should be able to see what I'm working on, but can't really see if I'm present in the area.
So, yeah, if you want to see what I'm up to, model wise, have a peak at the new camera page here:
New DeskCam Fanciness!!
Note that while a new image is uploaded to the server every two minutes while the camera is running, the page itself does not manually refresh. If you want to get the latest and greatest image, you'll need to reload the page.
Also, the image has a date and time in the upper left corner. If that isn't a current (US Pacific time zone) time, then I've either got the camera turned off, or nothing is happening, so the camera has stopped uploading images.
Party on.
Saturday, June 19, 2010
A Sneak Preview
Just a quick post to bring things up to date. Here's a quick look at upcoming projects.
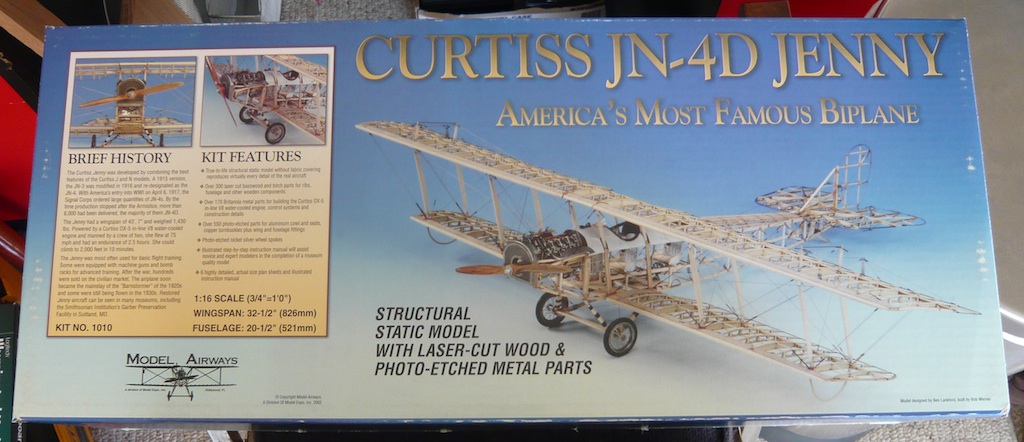
This past week I received a kit for another wooden and metal model. This one is a WWI biplane, the Curtiss JN-4D 'Jenny'. I'm hoping that it'll be a challenging build, similar to the Sloop build, except with much more metal and photo-etch. I'm actually hoping to set up a time-lapse recording method for this build, using an old computer, and a webcam. But since I think this might take me a little bit to get set up and tested, I'm going to hold off on starting this build for a little while.


So, in the meantime, after wrapping up the motorcycle model (which I plan on doing today), I'll be putting this one together:

It should be a quick, fun build, since there isn't any engine. I was in the mood to make something shiny before I start on a longer build, so I figure I can crank through this one in a few weeks, and should be able to test out my timelapse setup in the process :)
And there we have it. That's my modeling progress brought up to date. Party on.
This past week I received a kit for another wooden and metal model. This one is a WWI biplane, the Curtiss JN-4D 'Jenny'. I'm hoping that it'll be a challenging build, similar to the Sloop build, except with much more metal and photo-etch. I'm actually hoping to set up a time-lapse recording method for this build, using an old computer, and a webcam. But since I think this might take me a little bit to get set up and tested, I'm going to hold off on starting this build for a little while.


So, in the meantime, after wrapping up the motorcycle model (which I plan on doing today), I'll be putting this one together:

It should be a quick, fun build, since there isn't any engine. I was in the mood to make something shiny before I start on a longer build, so I figure I can crank through this one in a few weeks, and should be able to test out my timelapse setup in the process :)
And there we have it. That's my modeling progress brought up to date. Party on.
And Moving Right Along....
I didn't rest long after wrapping up the Panzer. I jumped right into another vehicle of the same era and same scale. This kit is a BMW R75, manufactured by Lions Roar. I'm not adding any after market parts to this one, but it comes with quite a bit of detail out of the box. It's got a variety of photo-etched parts for the wheel spokes, various engine bits and for a few other small details, like the padlocks on equipment boxes. The kit also comes with a sidecar and two versions of a little trailer.
The build was pretty straightforward, with the exception of things just being very very small. The motorcycle is the same scale as the last tank model I built, at 1/35 scale. This makes the whole bike only a few inches long. As you can see from the photos below, there is a pretty good amount of detail in the kit. Also, overall the quality of the kit modeling, while pretty good, was not quite as good as the Panzer kit (which was made by Dragon), so required a good deal more cleanup of mold seams, etc. With the parts being as tiny as they were, this cleanup occasionally resulted in broken parts. This also led me to be fairly certain that I like working on larger models :)
I'm currently working on wrapping this project up, with weathering powders, etc, but as it's not quite done, here are a few photos of the model as of last weekend. My hope for this one is to combine it with the Panzer for display, so that I can put them both on the same wooden base. This just means that I've got to be sure they generally match color-wise and look like they've been living in the same world.
Assembled in sections, engine masked for painting the body.


After a base coat of dark yellow.
The build was pretty straightforward, with the exception of things just being very very small. The motorcycle is the same scale as the last tank model I built, at 1/35 scale. This makes the whole bike only a few inches long. As you can see from the photos below, there is a pretty good amount of detail in the kit. Also, overall the quality of the kit modeling, while pretty good, was not quite as good as the Panzer kit (which was made by Dragon), so required a good deal more cleanup of mold seams, etc. With the parts being as tiny as they were, this cleanup occasionally resulted in broken parts. This also led me to be fairly certain that I like working on larger models :)
I'm currently working on wrapping this project up, with weathering powders, etc, but as it's not quite done, here are a few photos of the model as of last weekend. My hope for this one is to combine it with the Panzer for display, so that I can put them both on the same wooden base. This just means that I've got to be sure they generally match color-wise and look like they've been living in the same world.
Assembled in sections, engine masked for painting the body.


After a base coat of dark yellow.
Looooooong Overdue Update...
So, yes, I realize I became one of those people that starts up a blog with all the intentions of keeping it updated, and then fell behind. But now I'm back and I've got a bunch of updates!
First and foremost, I've finished the Panzer III and have some photos of the finished project. I forgot to take photos of the outside, as I was putting everything together, so I really just have the images of the finished model. Everything on the outside was pretty straight forward, without all the complicated resin construction that the interior had.
The difficult bits of the exterior were really just the assembly of the individual-link plastic tracks and then the final assembly and weathering of the whole tank. I managed to get the tracks assembled by sticking the track links to a strip of thin masking tape, then draping that over the various wheels, and once in place, dabbing glue to where the tracks touch one another. I found that I could make each side in four or so sections, which still allowed me to take the tracks back off, paint them, and then, once the rest of the tank was painted, put the tracks back on again.
The painting was simply an airbrushed coat of dark yellow on most of the exterior, with a few of the detail parts picked out in other colors by hand. The road wheels were originally painted in German Grey, and then, using a plastic circle template as a mask, the centers were sprayed the same dark yellow as the rest of the tank. After the base coats were complete, I sprayed a slightly darker yellow into the nooks, crannies and corners to get a bit of shading. This was followed by a pass of drybrushing with a light tan to help pick out corners, details and texture.
Next came an extensive application of Mig Pigments. These are just colored powders, that get dusted onto the surface and then a bit of thinner is touched to the powder, and that helps it stick to the surface and flow into the texture of the surface and in between details. This serves to both further pick out detail when using a darker color pigment, and also to add dirt and grime when using lighter tones.
Once that was done, I cut a chunk of red oak for a base, put a few coats polyurethane on that and called it done! Since then, I have grown less happy with the base, feeling that it needed to better contrast with the model, so stay tuned for an update on that.
Here are a few images of the completed model, but see a more thorough set of photos here:
http://www.hello-napalm.com/photo_cols/panzerIII/
First and foremost, I've finished the Panzer III and have some photos of the finished project. I forgot to take photos of the outside, as I was putting everything together, so I really just have the images of the finished model. Everything on the outside was pretty straight forward, without all the complicated resin construction that the interior had.
The difficult bits of the exterior were really just the assembly of the individual-link plastic tracks and then the final assembly and weathering of the whole tank. I managed to get the tracks assembled by sticking the track links to a strip of thin masking tape, then draping that over the various wheels, and once in place, dabbing glue to where the tracks touch one another. I found that I could make each side in four or so sections, which still allowed me to take the tracks back off, paint them, and then, once the rest of the tank was painted, put the tracks back on again.
The painting was simply an airbrushed coat of dark yellow on most of the exterior, with a few of the detail parts picked out in other colors by hand. The road wheels were originally painted in German Grey, and then, using a plastic circle template as a mask, the centers were sprayed the same dark yellow as the rest of the tank. After the base coats were complete, I sprayed a slightly darker yellow into the nooks, crannies and corners to get a bit of shading. This was followed by a pass of drybrushing with a light tan to help pick out corners, details and texture.
Next came an extensive application of Mig Pigments. These are just colored powders, that get dusted onto the surface and then a bit of thinner is touched to the powder, and that helps it stick to the surface and flow into the texture of the surface and in between details. This serves to both further pick out detail when using a darker color pigment, and also to add dirt and grime when using lighter tones.
Once that was done, I cut a chunk of red oak for a base, put a few coats polyurethane on that and called it done! Since then, I have grown less happy with the base, feeling that it needed to better contrast with the model, so stay tuned for an update on that.
Here are a few images of the completed model, but see a more thorough set of photos here:
http://www.hello-napalm.com/photo_cols/panzerIII/
Saturday, February 13, 2010
Panzer III Interior Paint
With the interior build pretty much complete, I moved on to added a bit of paint. From what I could gather, the Germans painted everything in a red primer and left it that way for non-crew areas and painted all the crew areas in a dull grey-green.
I began by airbrushing the whole interior with Mr Surfacer 1200 as a primer and to give it all a uniform color. Next I sprayed the red-brown color onto the engine compartment and onto the engine and radiator assemblies. I decided to leave the engine and radiator parts separate during the painting and weathering process to make things easier. Finally, I masked the engine area and sprayed the crew cabin in the grey green.
Next I spent a bit of time picking out a few details by hand and adding metallic spots on corners to simulate paint chips. Here you can see a little of that in progress:

I followed that with a bit of dry brushing using a lighter tone to help pick out the details and raised bits. Next I tried out a technique that is new to me: the use of pigments. Pigment is the raw color component of many paints (although in a non-toxic version). I ordered a few sets of Mig Pigments from an online hobby store (since I have never seen more than a few jars locally), and now I've got 12 shades of rust, dirt, smoke and ash to choose from.
The jist of the pigments is that you sort of just use a dry brush to apply a variety of colors here and there, and then wet everything down with a thinner and use that to blend between colors and get the solution into all the cracks and crevices. I started out with a wash of black to help add contrast and pick out the details, and then followed up with various dirt and rust colors. I generally found it very easy to work with and I am quite pleased with the results.
A few images of paint and weathering (with the pigments):


That pretty much wraps up the interior. There are a few odds and ends to take care of, like cementing the engine parts in place and connecting a few things with pipes. I'm sure there will also be a bit of work going into the upper hull build as well, but that is all for a later post.
Next: Onward with the construction!
I began by airbrushing the whole interior with Mr Surfacer 1200 as a primer and to give it all a uniform color. Next I sprayed the red-brown color onto the engine compartment and onto the engine and radiator assemblies. I decided to leave the engine and radiator parts separate during the painting and weathering process to make things easier. Finally, I masked the engine area and sprayed the crew cabin in the grey green.
Next I spent a bit of time picking out a few details by hand and adding metallic spots on corners to simulate paint chips. Here you can see a little of that in progress:

I followed that with a bit of dry brushing using a lighter tone to help pick out the details and raised bits. Next I tried out a technique that is new to me: the use of pigments. Pigment is the raw color component of many paints (although in a non-toxic version). I ordered a few sets of Mig Pigments from an online hobby store (since I have never seen more than a few jars locally), and now I've got 12 shades of rust, dirt, smoke and ash to choose from.
The jist of the pigments is that you sort of just use a dry brush to apply a variety of colors here and there, and then wet everything down with a thinner and use that to blend between colors and get the solution into all the cracks and crevices. I started out with a wash of black to help add contrast and pick out the details, and then followed up with various dirt and rust colors. I generally found it very easy to work with and I am quite pleased with the results.
A few images of paint and weathering (with the pigments):


That pretty much wraps up the interior. There are a few odds and ends to take care of, like cementing the engine parts in place and connecting a few things with pipes. I'm sure there will also be a bit of work going into the upper hull build as well, but that is all for a later post.
Next: Onward with the construction!
Panzer III Interior Build
So, it's been quite a while sine I've updated so I've going to break this into two posts: one on the build and one about painting and weathering. First, the build:
I purchased resin interior and engine kits made by Verlinden. The interior kit was designed for a Tamiya version of the same tank, while the engine claimed it would fit both Tamiya and Dragon kits. When I got in there and slowly started piecing things together I discovered a few things:
First off, I'm not that crazy about working with large resin parts. There seems to be a ton of work to do just to get the part somewhere close to where it should be, since one needs to sand off a great deal of the overpour. There also seems to be a tendency of the large flat resin parts to warp a bit with the heat of sanding. I suppose these are things to learn about working with resin, and they will inform my future projects, but I just came away with the impression that resin is just plain less fun to work with compared to plastic or wood.
Next thing I learned was that the Tamiya version of the kit must not have all of the interior suspension parts that the Dragon kit does, as the resin parts had all of the same part cast into the floor of the interior. This gave me two options: cut away all the Dragon interior parts or cut away the resin parts. Since I thought the kit parts looked better than the resin parts, I opted for what was probably the hardest route, and decided to cut away the whole floor of the resin parts and replace it with a new version.
<-- floor cut away
In retrospect, a closer inspection of some reference photos could have saved me some trouble. I started with the impression that the floor inside the tank was a metal mesh, similar to what one would find on catwalks and other industrial settings. So I cut away all the floor, and found some fine screen, with the intention of using the screen for the floor to simulate the grating. This would allow the fancy suspension bit to be seen through the floor just a little bit. Later on, in my quest for find proper paint colors, I ran across some photos of a restored Panzer and it had flooring made of diamond plate, which is quite opaque. So, instead of the screen idea and instead of trying to find some scale diamond plate, I took some styrene sheet, heated it with a cooking torch (like for making creme brulee) and pressed the screen from a cooking splatter guard into it to form a criss-cross pattern that is similar to diamond plate.
Finally, I learned that the interior and engine kits both came with a firewall to go between. Once all the parts for the interior and exterior are in place, without any firewalls, they take up pretty much the whole interior, leaving not enough room for EITHER firewall. So, what I ended up having to do is to build a new firewall from scratch from styrene. I tried to get the general shape from both of the resin parts and even clipped off a few of the resin details and added them to the new version. I also found that I had to cut quite a bit off of the bottom of the engine in order to get it to sit low enough in the chassis for the upper hull pieces to be able to attach. This, of course, caused all the pipes to mis-align, so there are still a few things that will need tweaking once paint is done and I am cementing things into the hull.
Some images of the built-up interior and engine:

And finally, with a coat of Mr Surfacer 1200 as a primer:

Next: some paint!
I purchased resin interior and engine kits made by Verlinden. The interior kit was designed for a Tamiya version of the same tank, while the engine claimed it would fit both Tamiya and Dragon kits. When I got in there and slowly started piecing things together I discovered a few things:
First off, I'm not that crazy about working with large resin parts. There seems to be a ton of work to do just to get the part somewhere close to where it should be, since one needs to sand off a great deal of the overpour. There also seems to be a tendency of the large flat resin parts to warp a bit with the heat of sanding. I suppose these are things to learn about working with resin, and they will inform my future projects, but I just came away with the impression that resin is just plain less fun to work with compared to plastic or wood.
Next thing I learned was that the Tamiya version of the kit must not have all of the interior suspension parts that the Dragon kit does, as the resin parts had all of the same part cast into the floor of the interior. This gave me two options: cut away all the Dragon interior parts or cut away the resin parts. Since I thought the kit parts looked better than the resin parts, I opted for what was probably the hardest route, and decided to cut away the whole floor of the resin parts and replace it with a new version.
<-- floor cut awayIn retrospect, a closer inspection of some reference photos could have saved me some trouble. I started with the impression that the floor inside the tank was a metal mesh, similar to what one would find on catwalks and other industrial settings. So I cut away all the floor, and found some fine screen, with the intention of using the screen for the floor to simulate the grating. This would allow the fancy suspension bit to be seen through the floor just a little bit. Later on, in my quest for find proper paint colors, I ran across some photos of a restored Panzer and it had flooring made of diamond plate, which is quite opaque. So, instead of the screen idea and instead of trying to find some scale diamond plate, I took some styrene sheet, heated it with a cooking torch (like for making creme brulee) and pressed the screen from a cooking splatter guard into it to form a criss-cross pattern that is similar to diamond plate.
Finally, I learned that the interior and engine kits both came with a firewall to go between. Once all the parts for the interior and exterior are in place, without any firewalls, they take up pretty much the whole interior, leaving not enough room for EITHER firewall. So, what I ended up having to do is to build a new firewall from scratch from styrene. I tried to get the general shape from both of the resin parts and even clipped off a few of the resin details and added them to the new version. I also found that I had to cut quite a bit off of the bottom of the engine in order to get it to sit low enough in the chassis for the upper hull pieces to be able to attach. This, of course, caused all the pipes to mis-align, so there are still a few things that will need tweaking once paint is done and I am cementing things into the hull.
Some images of the built-up interior and engine:

And finally, with a coat of Mr Surfacer 1200 as a primer:

Next: some paint!
Subscribe to:
Posts (Atom)